Three.js is a powerful tool. It helps bring 3D design and animation to the browser in a performant and adaptable way. But it can be tricky to get started if you’ve never delved into the world of 3D programming before.
I had some basic experience playing with the Unity Game Engine, Unreal Engine and C#, but otherwise many of the concepts were new to me. I realised there weren’t many step-by-step-friendly resources out there, and so I decided to write this article along with understanding everything by myself. In it, we’ll look at the main elements of a Three.js scene, from meshes and material to geometries, loaders and more.
By the end of the article, I should have a solid understanding of the basic building blocks necessary to add an extra dimension to your web project. Funny thing I do not know as this paragraph has been written.
Vectors and boxes — the fundamental building blocks
So first things first. What are we dealing with? Often, the two most important classes in Three.js are Vector3 and Box3 . If you’re new to 3D (which I am), this stuff might sound a little abstract, but we’ll encounter them a lot! But I assume as long as you are here you’re at least familiar with basic geometry and know what vector or/and sphere, cube is…please…know it.
Vector3
The most basic 3D class, containing three numbers x , y and z like a real vector, duh. This can be used to represent a point in 3D space or a direction and length. For example:
const vector = new THREE.Vector3(1, 1, 1);Cool, not really - let’s see the image and move along, there is still a tons of material to cover.
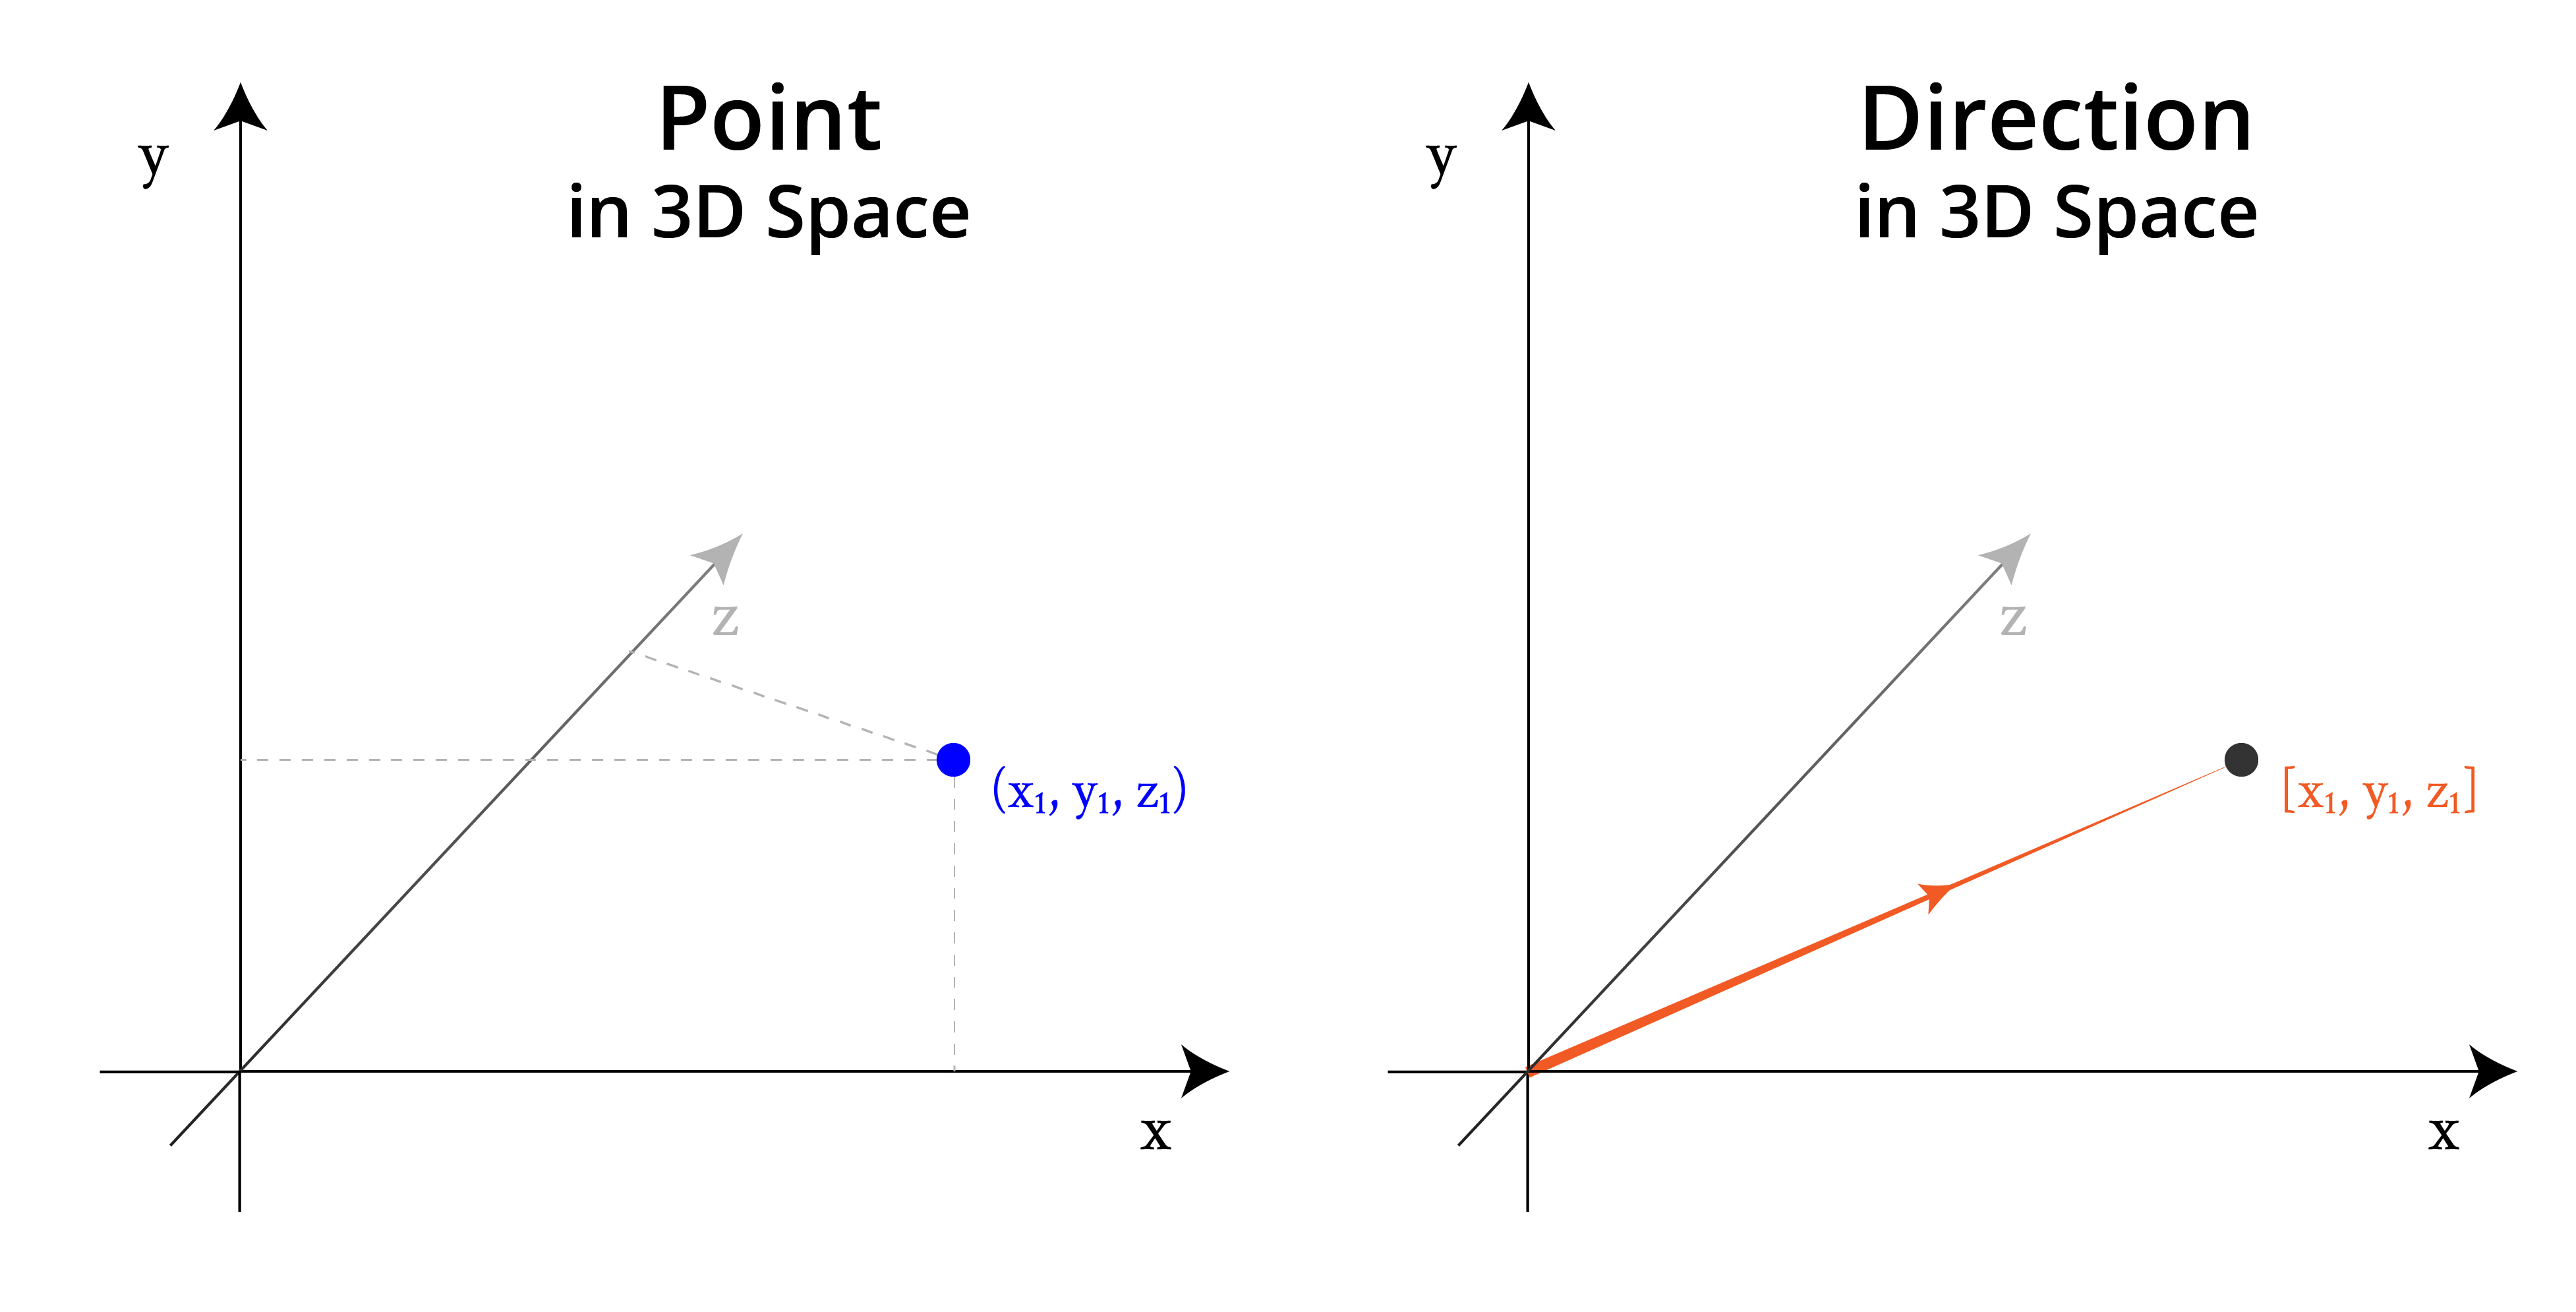
Apparently lots of 3D constructors take vector objects as arguments, including the Box3 below.
Though I can create meshes without this knowledge, as soon as you start trying to move or manipulate your models, these classes will come in handy. Now, I’ll move away from the abstract to the things that I can see. Finally!
Box3
This class represents a cuboid…a literally box. Its main purpose is to get the bounding box of other objects — that is, the smallest possible cuboid that a 3D object could fit in. Every Box3 is aligned to the world x , y and z axes.
Here’s how to create a box using a Vector3:
const vector = new THREE.Vector3(1, 1, 1);
const box = new THREE.Box3(vector);
And here’s how to create a box based on an existing 3D object:
const box = new THREE.Box3();

box.setFromObject(object);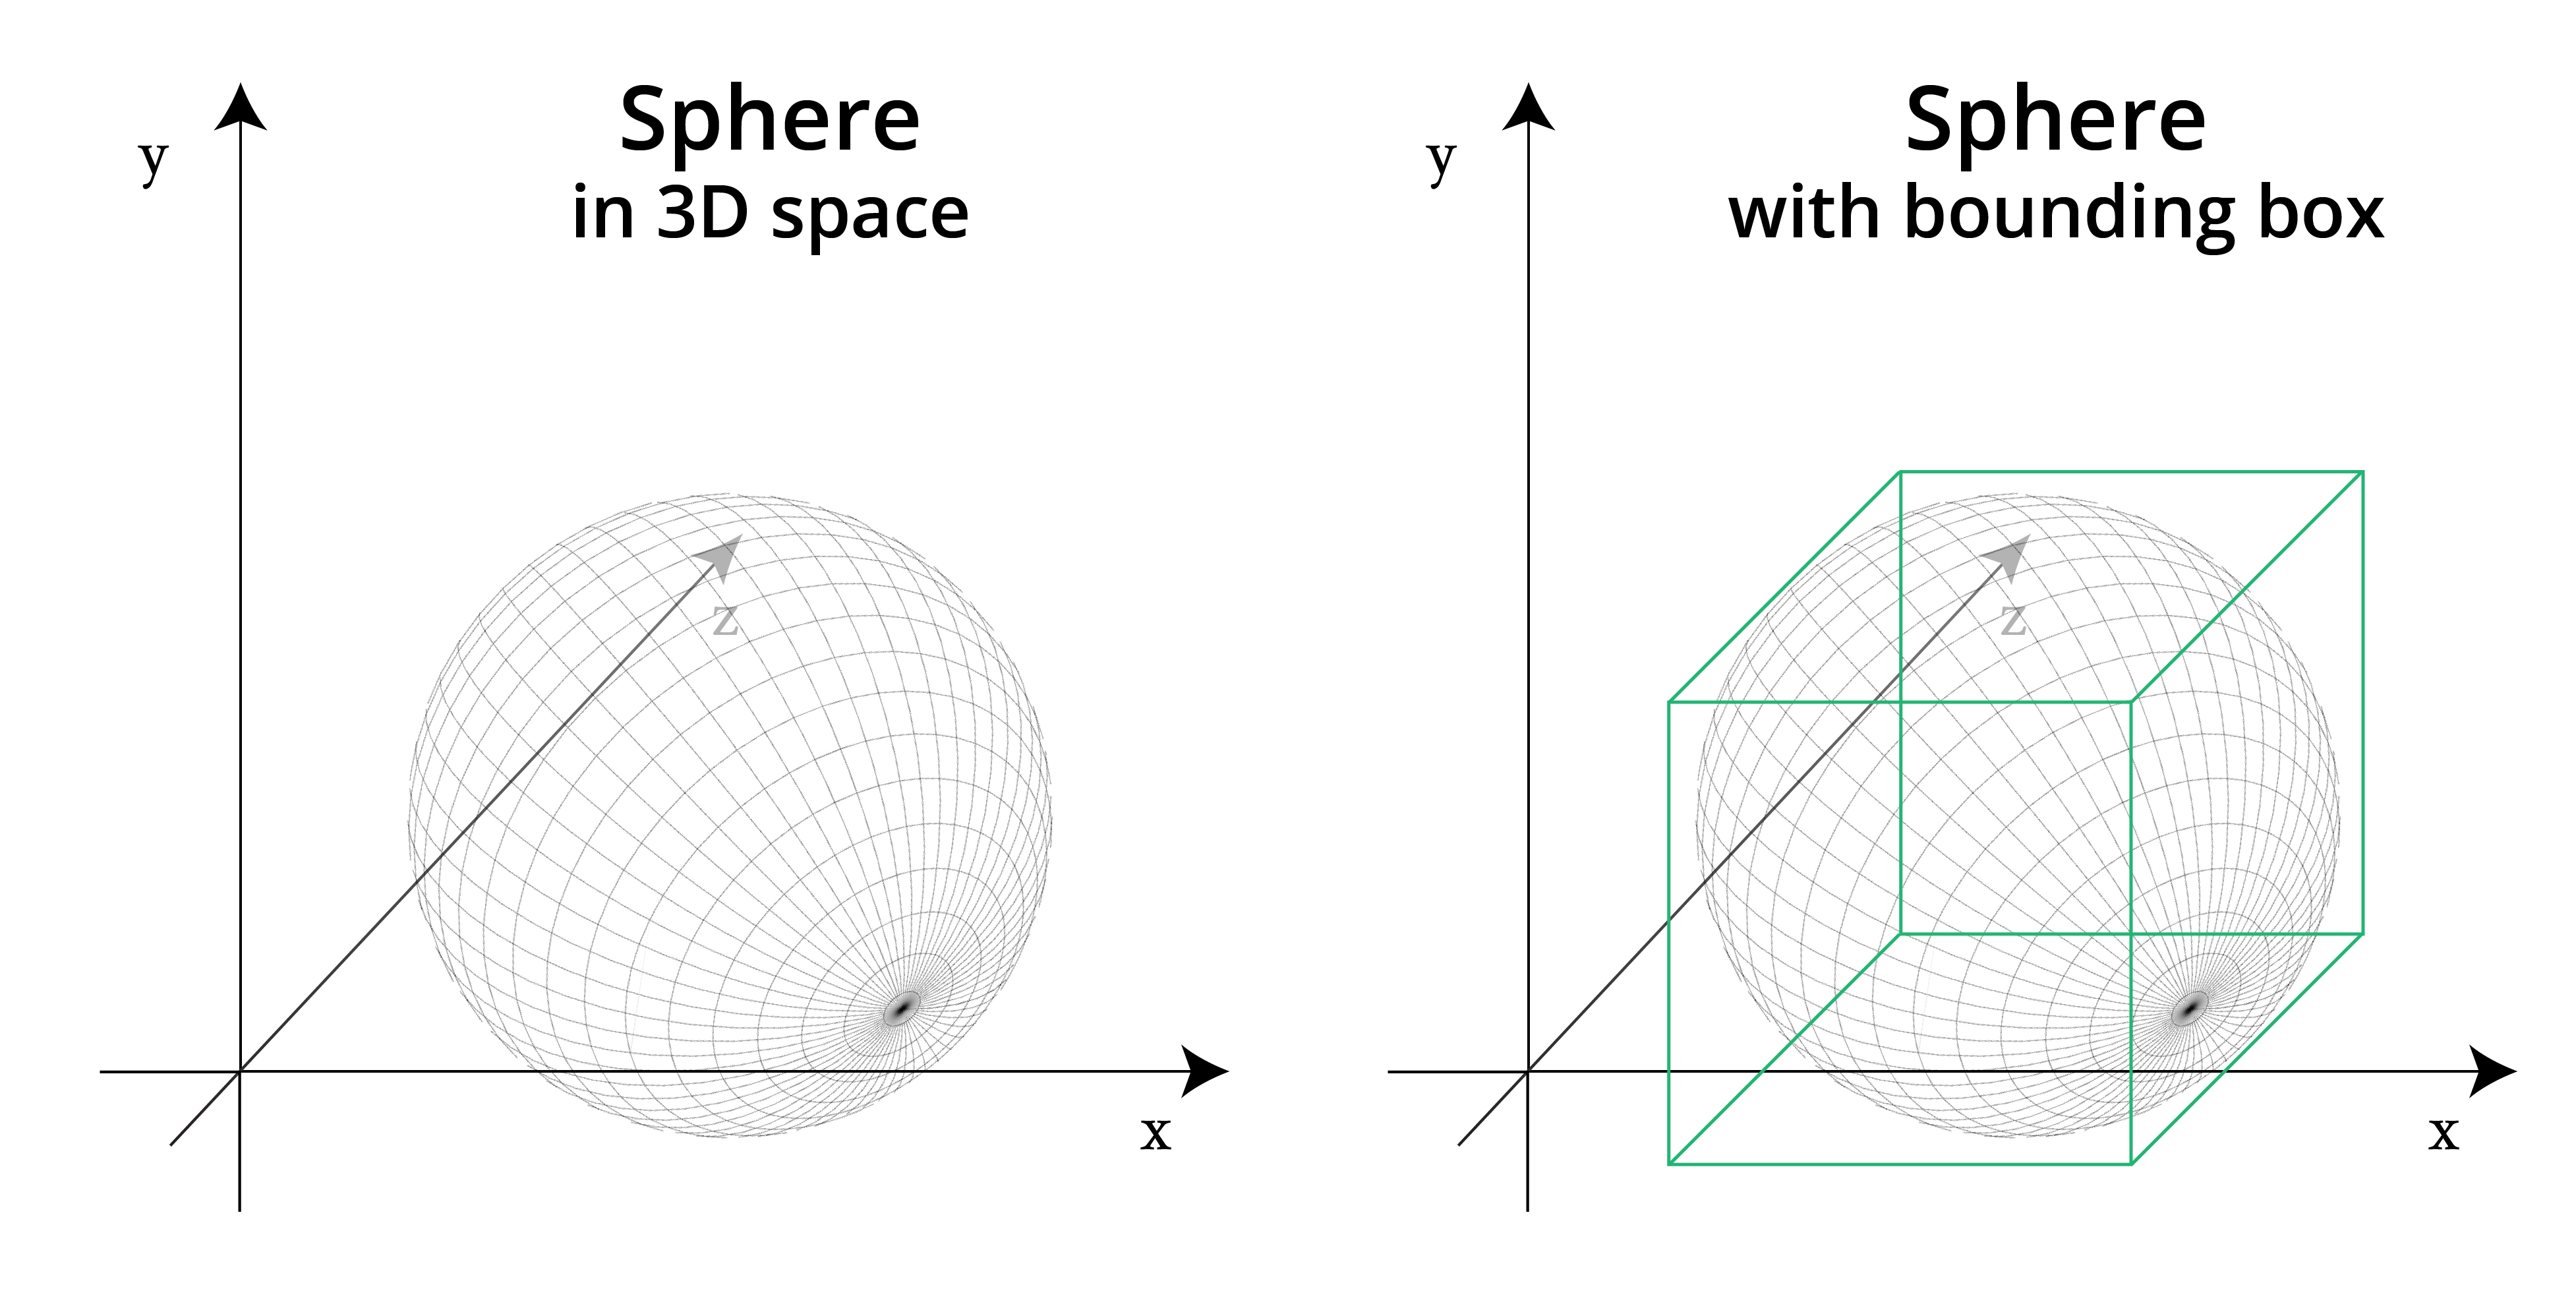
Though you can create meshes without this knowledge, as soon as you start trying to move or manipulate your models, these classes will come in handy. Now, we’ll move away from the abstract to the things that we can see!
Meshes
In Three.js, the basic visual element in a scene is a Mesh. This is a 3D object made up of triangular polygons. It’s built using two objects:
- a
Geometry— which defines its shape, - a
Material— which defines its appearance.
These definitions can get a little more complicated (the Geometry , for example, can contain colour data), but that’s the main distinction.
Geometry
Depending on use-case, I’ll either want to define a geometry within Three.js or import one from a file. Have no idea about the second one so let’s stick to the Three.js.
Using functions like THREE.TorusKnotGeometry , I can create complex-looking shapes with single lines of code. I’ll google how exactly in a moment, but first let’s cover a few simple shapes.
Apparently simplest 3D shape, a cuboid or box, can be defined with a width , height and depth :
const geometry = new THREE.BoxGeometry( 20, 20, 20 );For a sphere, the minimum information we need to provide is the radius , widthSegments and heightSegments . The latter two variables tell us the number of triangles the model should use to represent the sphere: the higher the number, the smoother the appearance of the sphere:
const geometry = new THREE.SphereGeometry( 20, 64, 64 );If we want to make pointed or triangle shapes, one option is a cone. Its arguments are a mix of the arguments supplied to the previous two geometries. Below, we specify radius , height and radialSegments .
const geometry = new THREE.ConeBufferGeometry( 5, 20, 32 );These are just a few of the most common shapes. Three.js comes with lots of built-in geometries, which you should check out in the docs. For most of this tutorial, we’ll use a more interesting shape, built using the TorusKnotGeometry method.
Why this shape looks the way that it does is beyond the scope of this tutorial, but I encourage you to play around with the values, as you can make some very interesting objects in just a single line of code!
const geometry = new THREE.TorusKnotGeometry(10, 1.3, 500, 6, 6, 20);Loaders
As we’ve discussed, it’s possible to manually define the geometry of your meshes. However, in practice, many people will often prefer to import their geometries from 3D files. Luckily, Three.js has plenty of supported loaders, covering most of the major 3D file formats.
The basic ObjectLoader loads a JSON resource, using the JSON Object/Scene format. But most loaders need to be imported manually. Here are imports for several common formats:
// GLTF
import { GLTFLoader } from 'loaders/GLTFLoader.js';
// OBJ
import { OBJLoader } from 'loaders/OBJLoader.js';
// STL
import { STLLoader } from 'loaders/STLLoader.js';
// FBX
import { FBXLoader } from 'loaders/FBXLoader.js';
// 3MF
import { 3MFLoader } from 'loaders/3MFLoader.js';
The recommended file format for online viewing is GLTF , on the grounds that it’s focused on runtime asset delivery, compact to transmit and fast to load’.
Of course, there may be reasons to prefer a specific file (for example, if the quality is your priority, or if you need to accurately represent files for 3D printing). But if you can, you’ll likely get the best performance online by importing your files in the GLTF format.
import { GLTFLoader } from 'loaders/GLTFLoader.js';
import model from '../models/sample.gltf';

const loader = new GLTFLoader();

loader.load(model, function (geometry) {
  // your scene goes here
}, undefined, function (err) {
  console.error(err);
});
Bringing it on!
One of the reasons that Three.js can seem intimidating is that, if you’re building something from scratch, a fair amount of code is required just to see something on your screen. In every example so far, we’ve needed to create a scene and a camera. To keep things simpler, I’ve kept this code out of the way at the bottom, but we’ll now look at bringing everything together.
The way you order and organise your code is up to you. In simpler examples, like the ones in these articles, it makes sense to include all the Three.js code in one place. But, in practice, it can be useful to divide the separate elements to make the codebase easier to manage and scale.
For simplicity, we’ll look at the elements you’ll need to render a single object and we’ll do so in a single JavaScript file. Here’s an outline to get you started, which will render the:
// Import dependencies
import * as THREE from 'three';
import { OrbitControls } from 'three/examples/jsm/controls/OrbitControls.js';

// Create Scene
const scene = new THREE.Scene();
scene.background = new THREE.Color(0x5d93ff);

// Define a camera, set it to fill the browser window and position it
const camera = new THREE.PerspectiveCamera(75, window.innerWidth / window.innerHeight, 0.1, 10000);
camera.position.z = 5;

// Define a renderer, and set it to fill the browser window
const renderer = new THREE.WebGLRenderer();
renderer.setSize(window.innerWidth, window.innerHeight);

// Get an element from the DOM and append renderer.domElement to it
document.getElementById('scene').appendChild(renderer.domElement);

// Add controls, targetting the same DOM element
let controls = new OrbitControls(camera, document.getElementById('scene'));
controls.target.set(0, 0, 0);
controls.rotateSpeed = 0.5;
controls.update();

// Define (or import) your object's geometry
const geometry = new THREE.TorusKnotGeometry(10, 1.3, 500, 6, 6, 20);

// Define your object's material
const material = new THREE.MeshStandardMaterial({
  color: 0xF7A046,
  emissive: 0x111111,
  specular: 0xffffff,
  metalness: 1,
  roughness: 0.55
});

// Create the mesh, scale it and add it to the scene
const mesh = new THREE.Mesh(geometry, material);

mesh.scale.x = 0.1;
mesh.scale.y = 0.1;
mesh.scale.z = 0.1;

scene.add(mesh);

// Create lights, position them, and add them to the scene
const frontSpot = new THREE.SpotLight(0xF7A958);
const frontSpot2 = new THREE.SpotLight(0xFAC690);

frontSpot.position.set(1000, 1000, 1000);
frontSpot2.position.set(-500, -500, -500);

scene.add(frontSpot);
scene.add(frontSpot2);

// Create an animate function, which will allow you to render your scene and define any movements
const animate = function () {
  requestAnimationFrame(animate);

  mesh.rotation.x += 0.005;
  mesh.rotation.y += 0.005;
  mesh.rotation.z += 0.005;

  renderer.render(scene, camera);
};

// Call the animate function
animate();
Framework for Three.js
Finally, it’s worth discussing whether or not to use a framework-specific incarnation of Three.js. Currently, the most popular of these is the fantastic react-three-fiber, for React, duh. There are some big advantages to using a package like this — namely, you get to keep a component-based structure, which allows you to easily manage and re-use code.
Long story short, make up your mind whether to use framework or not based only on current project specification. There is no crucial impact onto usage simplicity. For example check out this awesome project of Bruno Simon based on vanilla Three.js
Instead of Conclusion
And that’s all you need to really get started with Three.js. Hope you learned something new and useful.